


The Easy Guide to Installing a Residential Faucet in an RV Kitchen
- Lou @RVHabit

- May 15
- 4 min read
Upgrading an RV kitchen faucet to a residential faucet is one of those small projects that makes your rig feel way more like home. Better reach, smoother handles, and a sturdier feel—especially in a compact RV like a Rockwood Geo Pro—can totally change how your kitchen works day to day.

But there’s one key detail that trips people up:
Most RV plumbing is 1/2", while many residential faucets use 3/8" connections.
That size difference is exactly why you need a 1/2" NPT × 3/8" compression adapter. (Always check the connections before making any purchases). While this article details a common scenario in many RVs, your specific application may be different.
RV vs residential faucet connections
In most RVs:
RV plumbing: 1/2" NPT on the supply side. Often connected to PEX or flexible lines
On many residential faucets:
Faucet supply lines: 3/8" compression (usually braided stainless or flexible lines) Designed to connect to 3/8" shutoff valves in a house
So when you try to hook a residential faucet directly to RV plumbing, the sizes don’t match. The RV side is 1/2", the faucet side is 3/8"—and that’s where the adapter comes in.
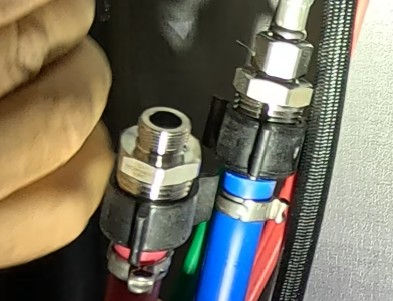
What the 1/2" NPT × 3/8" compression adapter actually does
You’re looking for an adapter that:
Has 1/2" male NPT on one side (to thread onto the RV’s 1/2" female fitting)
Has 3/8" compression on the other side (to accept the faucet’s 3/8" supply line)
In most installs, you’ll need two adapters: (typically sold in pairs)
One for hot
One for cold
These adapters:
Bridge the size difference between RV plumbing and residential faucet lines
Let you keep your existing RV plumbing
Create a clean, leak‑free transition without hacking anything together

Step‑by‑step overview of the install
This is a general flow you can adapt to your specific RV and faucet:
1. Shut off water and relieve pressure
Turn off the pump and/or disconnect city water
Open a faucet to relieve pressure in the lines
Open low point drain lines
2. Remove the old RV faucet
Crawl under the sink and disconnect the 1/2" RV supply lines
Remove the mounting nuts holding the faucet to the sink
Lift the old faucet out
3. Prep the sink and install the new faucet
Clean off old sealant or putty, if any
Drop the new residential faucet into the mounting holes
Tighten the mounting hardware per the faucet instructions
4. Install the adapters (this is the key step)
Thread the 1/2" male NPT side of each adapter onto the RV’s 1/2" female fitting
Do not use Teflon tape if there is a washer
Snug them up—firm, but don’t over‑crank
5. Connect the faucet’s 3/8" lines
Connect each 3/8" faucet supply line to the 3/8" compression side of the adapter
Tighten the compression nuts by hand, then snug with a wrench
Compression fittings seal by pressure—no tape needed
6. Turn water back on and check for leaks
Turn on the pump or reconnect city water
Slowly pressurize the system
Check every connection: NPT side and compression side
If you see a drip, give the fitting a tiny additional snug
Why this upgrade is worth doing
Swapping to a residential faucet in your RV gives you:
Better ergonomics: higher spout, easier dish washing
Smoother operation: better valves and handles
More durable build: metal instead of flimsy plastic
Cleaner look: modern styles that match your home kitchen
For rigs like my Rockwood Geo Pro, where space is limited, a well‑designed residential faucet can make the whole kitchen feel more functional.
Final thoughts
The biggest “gotcha” in installing a residential faucet in an RV isn’t the tools or the difficulty—it’s the size mismatch:
RV side: 1/2"
Residential faucet side: 3/8"
Once you know that and grab the correct 1/2" NPT × 3/8" compression adapters, the rest of the job is straightforward. Links are below.
Watch me install a residential faucet in an RV
(Affiliate) Links:
⭐ Black Pull-Down Kitchen Faucet: https://shoplowes.me/4fjnMEo
⭐ 1/2” NPT x 3/8” Compression Adapter: https://amzn.to/4sy3iL8
✅ LevelMatePro+: https://amzn.to/4diOVoj
✅ Fridge/Freezer Wireless Thermometer: https://amzn.to/4tCTHmX
✅Mini Low Point Drain Valve: https://amzn.to/4uKaLZ1
✅Camco EvoFlex2 Water Hose: https://amzn.to/3Pejxj1
✅WattCycle 314ah Mini Lithium Battery: https://amzn.to/4uRCBTr
✅Tosot 16k RV AC/Heatpump: https://amzn.to/4fhv23A
✅Turbro RV AC Soft Start: https://amzn.to/4dozgUL
✅Lippert Screen Door Assist Handle: https://amzn.to/4eJFqRF
✅RV Bug Stop Panel Closer: https://amzn.to/4uQtXoe
✅Camco TST Pro Black Tank Treatment: https://amzn.to/4eEZ4OC
✅Dumpman RV Sewer Hose: https://amzn.to/4uDXgtY
✅Alpha Self-Leveling Lap Sealant: https://amzn.to/3R8E1dx
✅Sashco Clear Lexel Caulk: https://amzn.to/42u56dJ
✅Boeshield T-9 Lubricant: https://amzn.to/4wxd8QQ
✅Exploreland Tire Covers: https://amzn.to/48UJkDA
🛠️My RV Tech Tools
✅Kobalt 8-Piece SAE Flex Head Ratchet Wrenches: https://shoplowes.me/4lBsGvW
✅Bosch 12V Drill/Driver Set: https://shoplowes.me/4dhLoXq
✅Southwire 12-in-1 Multi-bit Screwdriver: https://amzn.to/3PzB2tY
✅Klein 11-in-1 Magnetic Screwdriver: https://shoplowes.me/3LJxyTx
✅Klein-Kurve Wire Stripper: https://shoplowes.me/4nWC12R
✅Kobalt 6 Piece Pliers Set: https://shoplowes.me/4qNaxPC
✅Klein CL390 Multimeter: https://shoplowes.me/4pfRlsn
✅Klein CL810 Multimeter: https://amzn.to/4npBibP
✅Southwire GFCI Tester: https://amzn.to/4wtnvVu
✅Southwire Non-Contact Voltage Tester: https://amzn.to/4tykC3i
✅Klein Non-Contact Voltage Tester: https://shoplowes.me/3MdYMC2
👍👍👍Save 10% on SnapPads for your trailer or RV: https://www.rvsnappad.com/discount/LOU08747
👍👍👍Get 10% off any purchase of $200.00 or more from Airlock. Use discount code, RVHABIT
Go to the Airlock website: https://www.airlockusa.com/discount/RVHABIT


Lou
You can also visit RV Habit's Amazon Page for all the great items we use at
As an Amazon Associate, I earn from qualifying purchases
You can also visit RV Habit's Lowe's Storefront for all the great tools we use at
As a #LowesCreator, I earn from qualifying purchases


Comments